In the realm of strand-by-strand hair extensions, two popular methods stand out for their versatility and natural look: Flat Tip and I-Tip extensions. Both extension types are typically attached to the natural hair using microbeads (micro rings) or small cylinders without the need for heat or glue, making them a favored option among stylists and clients seeking healthier application methods. Although they share similarities in installation, they differ in tip shape, comfort, styling flexibility, and overall maintenance requirements. In this guide, we’ll break down how each type of extension works, their pros and cons, and who might benefit most from each.
1. What Are I-Tip Extensions?
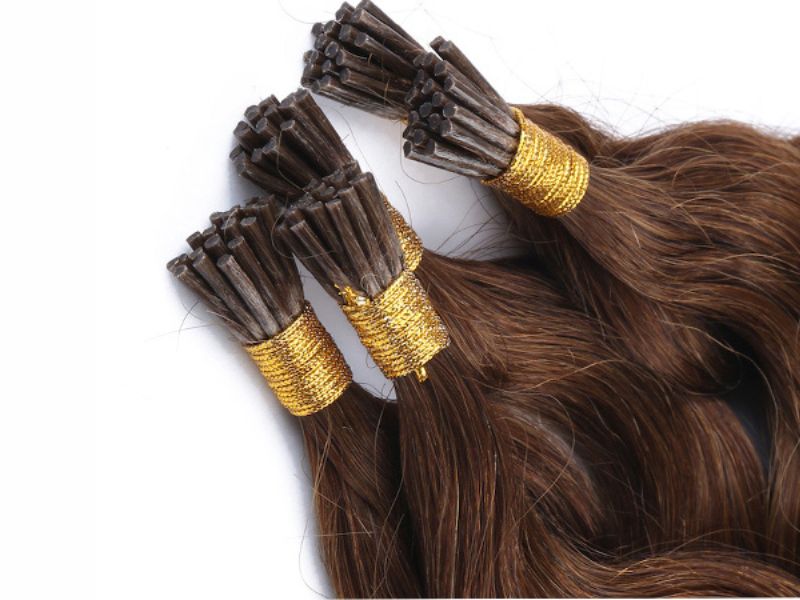
I-Tip extensions (often called “Stick Tip” extensions) get their name from the cylindrical or “I”-shaped tip of the extension bundle. Each bundle is a small grouping of hair that is pre-bonded at the top with a firm keratin tip, shaped similarly to a shoelace tip. The stylist attaches each extension strand to the client’s natural hair using a small, silicone-lined microbead or micro ring.
1.1. Installation Process
- The stylist threads a microbead onto a small section of the client’s hair.
- The I-Tip extension (the “stick” part) is inserted into the same bead.
- Using extension pliers, the stylist clamps down on the bead to secure the extension in place.
This cold-fusion technique avoids heat and glue, which can be gentler on both the client’s hair and scalp when applied correctly.
1.2. Key Advantages of I-Tips
- Secure Fit: The cylindrical shape is easily inserted into microbeads, providing a snug hold.
- Natural Movement: Because each strand is applied individually, the extensions move like the client’s natural hair.
- Low-Maintenance: If installed correctly, I-Tips can last 8–12 weeks before needing adjustments (depending on hair growth).
- No Heat or Glue: I-Tips are installed with rings rather than adhesive, reducing potential damage to natural hair.
1.3. Potential Drawbacks
- Bead Visibility: In certain hairstyles (especially updos), the small beads may become visible if not placed correctly or if the client has fine hair.
- Possible Slippage: If the beads are not clamped firmly or the client’s hair is particularly smooth, some slippage can occur over time.
- More Time-Consuming Installation: Each I-Tip extension is applied strand by strand, which can be labor-intensive for those seeking a full-head installation.
2. What Are Flat Tip Extensions?

Flat Tip extensions also rely on microbeads or rings for attachment, but the tip of each strand has a flat, ribbon-like shape rather than a cylindrical one. This unique structure can offer a slightly more comfortable feel for many clients, as the extension lies flatter against the head once attached.
2.1. Installation Process
- A small section of the client’s natural hair is isolated.
- A microbead is slid onto this hair section, as with I-Tip extensions.
- The flat, ribbon-shaped tip of the extension is inserted into the bead.
- Using pliers, the bead is clamped to lock the hair extension in place.
2.2. Key Advantages of Flat Tips
- Comfortable Base: The flatter tip can lie more snugly against the scalp, leading to increased comfort for some clients.
- Natural Blending: The flat shape can distribute hair more evenly, reducing any bulky feel or look at the attachment point.
- Great for Fine or Thin Hair: Because they lay flatter, these extensions may be less visible on those with fine hair who need to conceal extension points.
- No Heat or Glue: Like I-Tips, Flat Tips are installed with a cold-fusion method, helping preserve the integrity of the client’s natural hair.
2.3. Potential Drawbacks
- Slightly Higher Material Cost: Flat Tip extensions can sometimes be more expensive, reflecting the updated design and manufacturing.
- Bead Placement Sensitivity: Proper bead placement and tightening are crucial for a flat-laying result; otherwise, the extension may twist or buckle if not clamped correctly.
- Availability: While growing in popularity, Flat Tips may not be as universally available as I-Tips, depending on your region or preferred supplier.
3. Side-by-Side Comparison
| Feature | I-Tip Extensions | Flat Tip Extensions |
|---|---|---|
| Tip Shape | Cylindrical or “stick” shape | Flat, ribbon-like shape |
| Comfort Level | Generally comfortable, but some feel the bead might protrude slightly | Often more comfortable due to flatter tip lying closer to the scalp |
| Visibility | Beads can become slightly more visible in certain hairstyles | The flat tip can be easier to conceal, especially in finer hair |
| Hair Types | Works well for medium-to-thick hair; can be used on fine hair with skilled styling | Ideal for many hair types, especially thin or fine hair needing a more discreet application |
| Installation Method | Cold-fusion using microbeads; requires professional skill | Also cold-fusion; similar bead attachment, but tip shape changes positioning |
| Longevity | Typically 8–12 weeks before maintenance (depends on hair growth) | Similar 8–12 weeks before maintenance |
| Styling Versatility | Highly versatile; strands move freely | Equally versatile; flat tip may distribute hair more evenly |
| Maintenance | Requires occasional bead re-tightening or repositioning as hair grows | Similar bead maintenance schedule |
| Cost | Broad price range; often slightly more affordable | Can be marginally more expensive due to specialized tip design |
4. Which Method Suits You Best?
While both I-Tip and Flat Tip extensions can create stunning transformations, the best choice depends on hair type, lifestyle, and personal comfort preferences.
-
Fine or Thin Hair
- Flat Tips often have a slight edge, since the flattened tip can be easier to conceal and may feel less bulky.
-
Thicker, Textured Hair
- I-Tips can be just as successful, provided the stylist knows how to place beads securely. Clients with thicker hair may not notice a difference in comfort between I-Tips and Flat Tips.
-
Active Lifestyles
- Both methods are considered secure for people who exercise regularly or swim. However, as with all extensions, wearing a swim cap or tying hair in a protective style can prolong extension life.
-
Budget Considerations
- I-Tips might be more widely available and come in a range of prices, whereas Flat Tips can sometimes be slightly higher-priced, depending on the supplier.
-
Stylist’s Experience
- Your stylist’s familiarity with a particular method often influences results more than the tip shape itself. An experienced professional can achieve a natural blend with either system.
5. Care and Maintenance Tips
Regardless of whether you opt for Flat Tip or I-Tip hair extensions, proper care at home will ensure they stay beautiful for as long as possible.
-
Gentle Brushing
- Use a loop brush or extension-friendly comb, starting from the ends and working upward in sections. This helps avoid pulling on the attachment points.
-
Wash Routine
- Keep water flow downward when washing. Avoid rough scrubbing near the beads or tips. Look for sulfate-free shampoos and conditioners to maintain the extension’s integrity.
-
Drying
- Pat gently with a microfiber towel and aim to fully dry the attachment points. Excessive moisture left around the beads can weaken their grip.
-
Styling
- Both extension types can handle heat styling within reason, but always use a heat protectant to keep your extensions and natural hair in top shape.
-
Scheduled Maintenance
- Return to your stylist every 6–10 weeks (depending on hair growth and styling habits) to check bead security, address slippage, and reposition extensions if necessary.
6. Frequently Asked Questions
-
Do Flat Tip and I-Tip extensions damage hair?
- When installed and maintained correctly, both methods are considered gentler than bonding or hot fusion. Damage mainly occurs if extensions are placed incorrectly or if aftercare is neglected.
-
Can I switch from I-Tips to Flat Tips or vice versa?
- Yes! Provided your hair is healthy enough to handle a removal and reinstall process, you can switch extension methods. Consult with a stylist experienced in both techniques for best results.
-
Which method is faster to install?
- Both require a similar, strand-by-strand approach. Overall time may come down to the stylist’s familiarity with the specific tip type. Neither method is typically considered “faster” than the other.
-
Are beads or rings standard across both methods?
- Yes, microbeads or micro rings with silicone lining are commonly used for both. The key difference lies in the shape of the hair extension tip, not the attachment accessory.
-
How do I decide which type is right for me?
- The simplest approach is to consult with an experienced stylist. They’ll assess your hair type, lifestyle, and budget, then recommend the method that suits your needs and desired look.
Conclusion
Both Flat Tip and I-Tip extensions belong to the same family of strand-by-strand, cold-fusion methods that offer natural movement, reduced damage risk, and easy maintenance. The primary difference lies in the shape of the extension tip—cylindrical for I-Tips and ribbon-like for Flat Tips—which affects how the extension lays against the scalp and how discreet the attachment may appear.
- Choose Flat Tips if you want a flatter, more comfortable fit—especially if you have fine hair or prefer a tip that’s easier to conceal.
- Choose I-Tips if you’re seeking a tried-and-true extension format with excellent versatility and slightly lower costs.
Ultimately, your stylist’s expertise and your commitment to proper aftercare will determine your extension experience. Whether you end up with Flat Tip or I-Tip extensions, you can enjoy longer, fuller hair that looks (and feels) just as gorgeous as the real thing.